Assalamualaikum Bro & Sis!
How are you today? :'D
Hopely Fine & Good yeah! ^^
Ok This time i want to Teach you the Interactive Tutorials BASIC MENU in Sony Vegas Pro for All Version...
ok for shorten the time lets Begin :'D
This is the Interactive Tutorials From Me, So im Sorry if my Explain not Fully Complete, Cause I'm just a Ordinary People :'3
Ok Just See & Read My Description... ^^
 |
| Image 1 |
in Image 1 you can see a "Standard Menu" they have "File" - "Edit" - "View" - "Insert" - "Tools" - "Options" - "Help" you can use them for help you to show more function in Sony Vegas Pro... (Fully just Try it! ^.^)
 |
| Image 2 |
in Image 2 you can see a numeric number there i give...
1. New Empty Project (Ctrl+Shift+N)
2. Open (Ctrl+O)
3. Save (Ctrl+S)
4. Save As
5. Render As
6. Properties (Alt+Enter)
7. Cut (Ctrl+X)
8. Copy (Ctrl+C)
9. Paste (Ctrl+V)
10. Undo (Ctrl+Z)
11. Redo (Ctrl+Y; Ctrl+Shift+Z)
12. Enable Snapping (Hold Shift to Override) (F8)
13. Automatic Crossfades (Ctrl+Shift+X)
14. Auto Ripple (Ctrl+L)
15. Lock Envelopes to Events
16. Ignore Event Grouping (Ctrl+Shift+U)
17. Normal Edit Tool (Ctrl+D)
18. Envelope Edit Tool
19. Selection Edit Tool
20. Zoom Edit Tool
21. Interactive Tutorials (Recomended to Learn this)
22. What's This Help (Shift+F1)
 |
| Image 3 |
in Image 3 you can see a numeric number there i give too...
Project Media:
This is the Explorer window. This window allows you to quickly browse your computer for audio, video, or still image files to use in your project.
You can drag a file from the Explorer to the timeline to use it in your project.
This is the Explorer window. This window allows you to quickly browse your computer for audio, video, or still image files to use in your project.
You can drag a file from the Explorer to the timeline to use it in your project.
23. Remove All Unused Media From Project
24. Import Media
25. Capture Video
26. Extract Audio from CD...
27. Get Media from the Web
28. Remove Selected Media From Project
29. Media Properties...
30. Media FX...
31. Start Preview
32. Stop Preview
33. Auto Preview
34. Views
35. Search Media Bins...
Trimmer:
This Trimmer window gives you another editing option. In the Trimmer window, a portion of a media file can be selected - or trimmed - and inserted into your project. You may also create subclips in the Trimmer window.
36. Selected Media for Preview
36. Selected Media for Preview
37. Sort Trimmer History
38. Clear Trimmer History
39. Remove Current Media from trimmer History
40. Trimmer on External Monitor
Video Preview:
This is the Video Preview window. The Video window displays your video, along with any text or backdrops, video effects, and transitions in your project.
This is the Video Preview window. The Video window displays your video, along with any text or backdrops, video effects, and transitions in your project.
41. Project Video Properties
42. Video Preview on External Monitor (Alt+Shift+4)
43. Video Output FX...
44. Split Screen View
45. Preview Quality
46. Overlays
47. Copy Snapshot to Clipboard
48. Save Snapshot to File...
The Audio Control:
This is the Mixer window. Use this window to adjust the overall project volume, set project properties, and preview your audio and video files.
This is the Mixer window. Use this window to adjust the overall project volume, set project properties, and preview your audio and video files.
49. Project Audio Properties...
50. Downmix Output
51. Dim Output
52. Open Mixing Console
Trimmer:
53. Loop Playback (Ctrl+Shift+L; Q)
54. Play From Start (Shift+Space)
55. Play (Space)
56. Pause (Enter; Play)
57. Stop (Esc; Stop)
58. Go to Start (Ctrl+Home)
59. Go to End (Ctrl+End)
60. Enable Timeline Overwrite
61. Add Media From Cursor (A)
62. Add Media up to Cursor (Shift+A)
63. Fit to Fill
64. Create Subclip...
Video Preview:
65. Record (Ctrl+R)
66. Loop Playback (Ctrl+Shift+L; Q)
67. Play From Start (Shift+Space; Shift+F12)
68. Play (Space; Ctrl+Space; F12)
69. Pause (Enter; Play; Ctrl+F12)
70. Stop (Esc; Stop)
71. Go to Start (Ctrl+Home)
72. Go to End (Ctrl+End)
73. Previous Frame (Alt+Left)
74. Next Frame (Alt+Right)
Trimmer:
75. Cursor Position (Ctrl+G)
76. Selection End (Ctrl+Shift+G)
77. Selection Length (Shift+G)
Video Preview:
78. Project
79. Frame
80. Preview
81. Display
Master Project Audio:
82. Master FX...
83. Automation Settings
84. Mute
85. Solo
86. Output Fader
 |
| Image 5 |
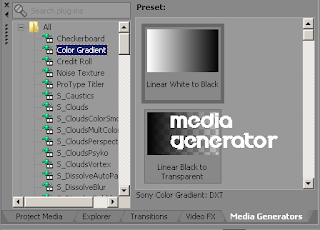
Media Generator: in this Window you can add some scene/gradient scene or much more, and you can add some text to Timeline on this window.
 |
| Image 6 |
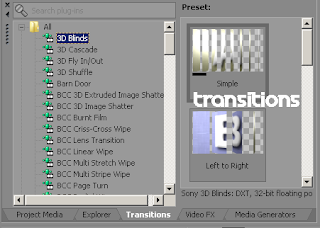
Transitions: in this Window you can add many Transitions for your Video (Not Music/Audio), You just Click Drag and Drop the Transition in the Middle of two Videos in Timeline.
 |
| Image 7 |
This is the track header.
Vegas Pro projects display audio, video, and bus tracks in this list.
The tracks extend to the right into the timeline and are used to arrange your audio, video, still images, and text and backdrops.
All of the settings for the tracks can be found here. You can adjust audio volume or panning, video compositing level, apply effects, temporarily mute or solo an audio or video track, apply track motion, change the recording mode, or change the track height.
Timeline:
In this Window you can Edit All your Video/Audio Project and this is so Powerfull Usefully...
This is the main work area (also called the timeline). The timeline allows you to arrange and edit all of your audio, video, and still images to create a movie.
Horizontally, the timeline represents time. In a way, the timeline is like a movie filmstrip or unraveled audio tape, where you can read your tracks from left to right.
Vertically, the timeline shows tracks. A track is a strip where you can put your audio or video files.
When an audio, video, or still image media file is placed on the timeline, it is referred to as an event. The timeline lets you precisely control the length and placement of the events in your movie.
87. Cursor Position in Time Display
This is the Vegas Pro time display. This area shows the current cursor position from the timeline.
The numbers are displayed in HH:MM:SS;FF format, which shows the number of hours, followed by the number of minutes, followed by the number of seconds. The last number (FF) indicates the current video frame you are on within that second.
Video Track:
88. Bypass Motion Blur
89. Track Motion...
90. Track FX...
91. Automation Settings
92. Mute
93. Solo
94. Level (Opacity)
95. Compositing Mode
96. Make Compositing Parent
97. Make Compositing Child
Audio Track:
98. Arm for Record
99. Invert Track Phase
100. Track FX...
101. Mute
102. Solo
103. Volume Slider
104. Automation Settings: Touch
105. Pan Slider
106. Output Meter
107. Rate
Under Timeline:
This is the transport toolbar for the timeline. From here, you can control playback of your project just like on a tape deck or CD player.
To play back your project, click the Play button and watch the video update in the Video Preview window.
108. Record (Ctrl+R)
To play back your project, click the Play button and watch the video update in the Video Preview window.
108. Record (Ctrl+R)
109. Loop Playback (Ctrl+Shift+L; Q)
110. Play From Start (Shift+Space; Shift+F12)
111. Play (Space; Ctrl+Space; F12)
112. Pause (Enter; Play; Ctrl+F12)
113. Stop (Esc; Stop)
114. Go to Start (Ctrl+Home)
115. Go to End (Ctrl+End)
116. Previous Frame (Alt+Left)
117. Next Frame (Alt+Right)
.
118. Cursor Position (Ctrl+G)
119. Selection End (Ctrl+Shift+G)
120. Selection Length
This is the status area for the timeline. The three highlighted boxes represent the selection starting time, ending time, and length.
If there is no selection in the timeline, this area displays the current cursor position.
If there is no selection in the timeline, this area displays the current cursor position.
Maybe just that Can I telling to you....
Easy Right? :'D
And I just want to Say, Sony Vegas Pro is Easy to Learning... Right? (^w^)v
Hope this Tutorial is Helpfully to solve your Editing Problem ^^
Maybe just that...
.
If anything else you dont Understand You Can Comment in this Article.
Thanks For Coming!
~ArtbustCreator~
See Ya! ( ^o^)/


EmoticonEmoticon